
With new emerging technologies, companies must quickly adapt and upgrade to more efficient ones. Spring Boot is an open-source Java web framework that allows developers to get started with an auto configurable production-grade Spring application. In this blog, you will go through the process of creating a simple Spring Boot application with a Database for storing the information. You will learn how to create HTTP endpoints and expose them for storing and retrieving data from the Database in JSON format.
Prerequisites
- A brief knowledge of the Kotlin programming language.
- The latest version of IntelliJ IDEA IDE.
The steps to create an application with Spring Boot are listed below:
The Spring Initializr will provide all the necessary configurations for the project. Then, you need to code the Data class for managing messages and add Database support to it. Finally, you expose the endpoints of the API.
Step 1: Bootstrapping the Project
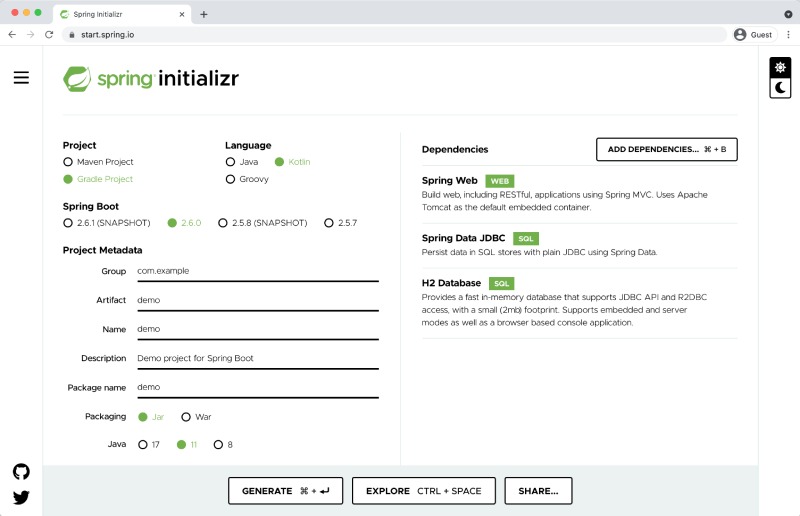
- First, you need to use the Spring Initializr to create a new project.
- Open the Spring Initializr by clicking here.
- It will navigate you to the project settings page for this tutorial to Spring Boot REST API already filled in.
- After providing all the details for your projects. Click on the “GENERATE” button to generate the project settings for you and download it.
- Navigate to the downloaded .zip file in your system.
- Unpack it and open it in the IntelliJ IDEA.
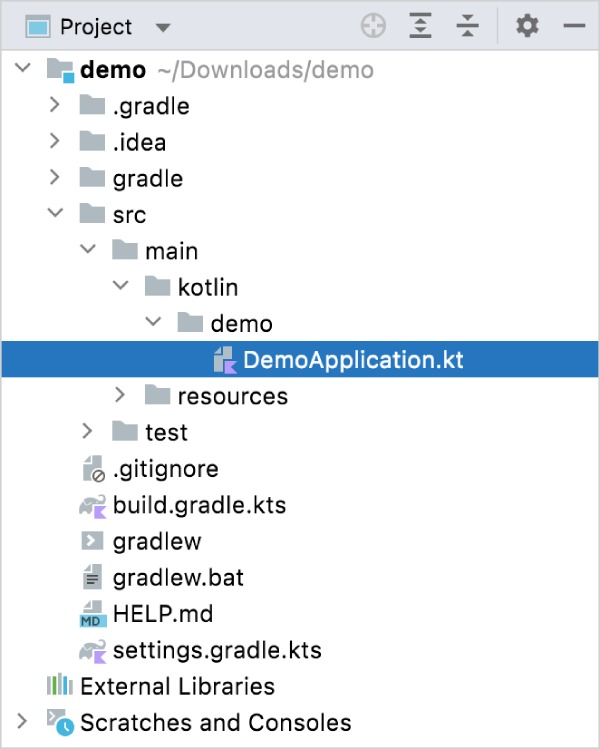
- Open the Project Explorer from the left-hand side navigation, and you can see the structure of the project, as shown in the image below.
- Here, the entry point of your application is the main() method of the DemoApplication.kt file.
Step 2: Creating a Data Class and a Controller
- Now, you need to create an endpoint and add a data class and a controller for Spring Boot REST API.
- Open the kt file, and here let’s create a Message data that will have 2 properties: id and text.
- The following code to create a Message data is given below.
data class Message(val id: String?, val text: String)
- Now, create a class named MessageResource that will take the requests and return the JSON document which will contain a collection of Message
@RestController
class MessageResource {
@GetMapping
fun index(): List<Message> = listOf(
Message(“1”, “First”),
Message(“2”, “Second”),
Message(“3”, “Third”),
)
}
- The full code of the kt file is given below.
package demo
import org.springframework.boot.autoconfigure.SpringBootApplication
import org.springframework.boot.runApplication
import org.springframework.data.annotation.Id
import org.springframework.web.bind.annotation.GetMapping
import org.springframework.web.bind.annotation.RestController
@SpringBootApplication
class DemoApplication
fun main(args: Array<String>) {
runApplication<DemoApplication>(*args)
}
@RestController
class MessageResource {
@GetMapping
fun index(): List<Message> = listOf(
Message(“1”, “First”),
Message(“2”, “Second”),
Message(“3”, “Third”),
)
}
data class Message(val id: String?, val text: String)
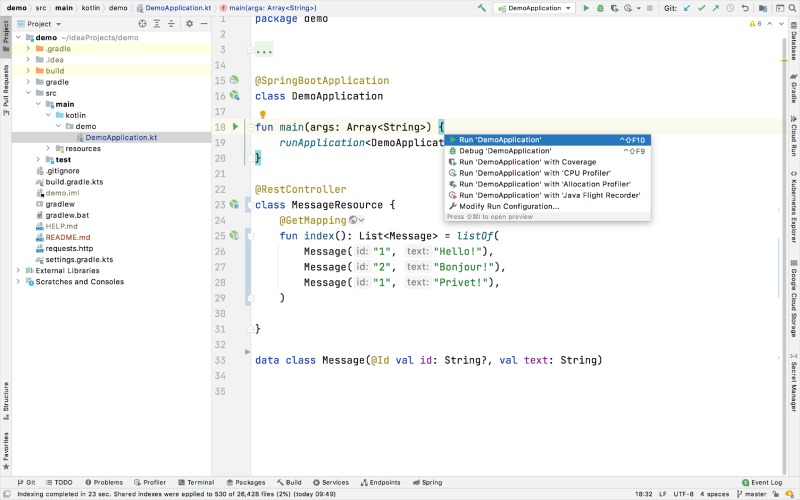
Step 3: Running the Application
- Let’s try to run the Spring Boot REST API project using the green RUN icon.
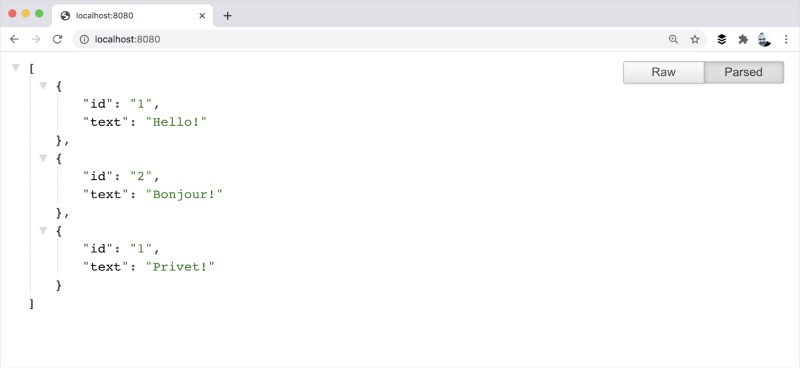
- As the application starts go to the localhost site on the web browser or open this URL: http://localhost:8080.
- Here, you can see the collection of Messages in JSON format loaded on the page.
Step 4: Adding Database Support
- For adding Database support to your Spring Boot REST API application. First, you need to create 2 endpoints.
- One endpoint is for saving the messages and the other endpoint is for retrieving them.
- Now, let’s declare mapping to the Database table by adding the @Table annotation in the Message
- Also, add the @Id annotation before the id These annotations require a few imports. The following code is given for reference.
import org.springframework.data.annotation.Id
import org.springframework.data.relational.core.mapping.Table
@Table(“messages”)
data class Message(@Id val id: String?, val text: String)
- Now, you need to use the Spring Data Repository API for accessing the Database. You have to create an Interface in which you will execute SQL queries for fetching data. The following code is given below.
import org.springframework.data.jdbc.repository.query.Query
import org.springframework.data.repository.CrudRepository
interface MessageRepository : CrudRepository<Message, String>{
@Query(“select * from messages”)
fun findMessages(): List<Message>
}
- Wherever you will call the findMessages() method in the MessageRepository, it will execute the SQL query provided along with @Query
Select * from messages
- The above query will retrieve a list of all the Message objects for you.
- Next, create a MessageService class that will contain the 2 methods listed below:
- A post() method that will write a new Message object to the Database.
- A findMessages() method for getting all the messages from the Database.
- The code to create a MessageService class is given below:
import org.springframework.stereotype.Service
@Service
class MessageService(val db: MessageRepository) {
fun findMessages(): List<Message> = db.findMessages()
fun post(message: Message){
db.save(message)
}
}
- Next, let’s update the MessageResource class and add MessageService class to it, so it can work with the Database.
- The code for the updated MessageResource class is given below.
import org.springframework.web.bind.annotation.RequestBody
import org.springframework.web.bind.annotation.PostMapping
@RestController
class MessageResource(val service: MessageService) {
@GetMapping
fun index(): List<Message> = service.findMessages()
@PostMapping
fun post(@RequestBody message: Message) {
service.post(message)
}
}
Step 5: Configuring the Database
- Now, you need to configure the Database in your Spring Boot REST API application.
- Navigate to the src/main/resources from the Project Explorer.
- Here, create a new folder with the name
- In the sql folder create a new file sql to store the Database schema.
- Open the sql file and update the following code given below.
CREATE TABLE IF NOT EXISTS messages (
id VARCHAR(60) DEFAULT RANDOM_UUID() PRIMARY KEY,
text VARCHAR NOT NULL
);
- Navigate to the src/main/resources directory and open the properties file. Here, add the following properties to enable the Database for your Spring Boot REST API application.
spring.datasource.driver-class-name=org.h2.Driver
spring.datasource.url=jdbc:h2:file:./data/testdb
spring.datasource.username=sa
spring.datasource.password=password
spring.datasource.schema=classpath:sql/schema.sql
spring.datasource.initialization-mode=always
Step 6: Executing HTTP Requests
- Now you need to use an HTTP client to work with previously created endpoints.
- Once your application is running, you can use the POST requests to store the database’s messages.
- First, create the http file in the src directory.
- Open the file and add the following HTTP requests given below.
POST http://localhost:8080/
Content-Type: application/json
{
“text”: “First”
}
POST http://localhost:8080/
Content-Type: application/json
{
“text”: “Second”
}
POST http://localhost:8080/
Content-Type: application/json
{
“text”: “Third”
}
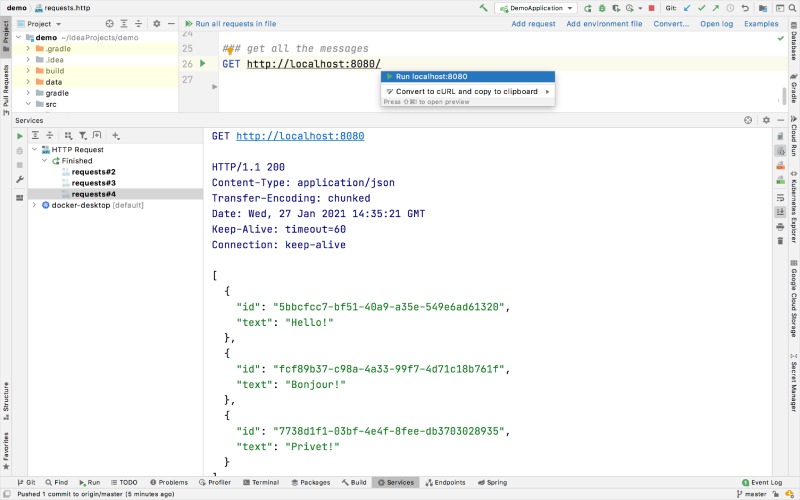
GET http://localhost:8080/
- Now, click the green RUN icon in the gutter next to the request declaration to execute all the POST requests.
![]()
- This will write the text messages to the Database.
- Similarly, execute the GET request and you can view the out in the Run tool window.
Conclusion
In this post, you learnt how to create a simple Spring Boot application with an HTTP endpoint, create a Database for storing objects, returning data in JSON format, and about endpoints for writing and retrieving Database objects.

Enhancing School Safety with Intelligent Threat Response Systems
Introduction According to the K-12 School Shooting Database, there were 346 school shootings in the United States in 2023 alone,…
What is Normalization in DBMS: The Complete Guide
What is normalization in DBMS? Look, I’m gonna be straight with you – when I first heard this term, I…